
Week 5, Assignment 5
3D Scanning and Printing
Video - Week Five, Lecture Five
3D Scanning:
3D Scanning is process which makes the mesh of a real-world object which can be further modified using different modelling tools.
3D Scanner
For this week's assignment I used XBox 360 Kinect as a 3D Scanner.

Software Installation
First for using the 3D Scanner I have to install the software for Windows as I was using Windows OS. To get the Software we can Directly Google and download. The Software used for 3D Scanning with XBox 360 Kinect was Skanect, here I downloaded the free version of its which was for "Non-Commercial use only", this version was having some limitation as the compared to paid version like, no colors are shown after scanning, etc. but it worked and served the purpose for which I was using.
Scanning:
I started with opening the software Skanect. To start with after opening the software I started a New File were as I was going to scan one of my friend I choose "Body" in Scene and Started scanning.

After starting the Scanning in the next Record window I simply clicked the record button and the scanning started soon after 3 second of countdown.
After the scan was complete and stopping the Record option, the software takes some time to construct and show the Scanned object. As it shows I was also able see the whole path traced by me while rotating, and as smooth as the path look the body scanned on software comes more precisely.
Then after finishing the Record part, I switched to Reconstruct window next to it where I just run the Fidelity to Low and reconstructed. Then after the reconstruct was done in the next window of Process in Geometry column there was Fill Holes option which will fill all the hollow parts on the scanned file and make it much more better then the before. So here I just Run the fill holes option at a Very Low Smoothing process as it was taking very much time while running it with Low Smoothing. After fill holes then it was time to remove the unwanted parts from the file scanned so just below Fill Holes was Move & Crop option which moved the File in such a manner that whatever was below the Blue Bottom surface was removed. After adjusting the file accordingly I wanted to Remove some parts from the file was not needed, so In Remove Parts Option just Run the command and see the magic.

Finally now it was time to save the file. So after performing all operation in the Process Windows and made the file good, now went to the next window of 'Share' were I was able to Save my Scanned object in various file formats such as, .ply, .stl, .obj, etc.
3D Scanned File can be downloaded from here:
NIved 3D Scanned file in '.STL' format
3D Printing:
3D Printing also known as additive manufacturing (AM), is one of the most influencing technology now a days. 3D printer are now so popular that with only a basic knowledge anyone can build his/her own printer with ease.
3D Printing, also known as Rapid Prototyping machine, refers to various processes used to synthesize a three-dimensional object. In 3D printing, successive layers of material are formed under computer control to create an object. These objects can be of almost any shape or geometry and are produced from a 3D model or other electronic data source. A 3D printer is a type of industrial robot. ~ Wikipedia
Group Assignment:
Testing the 3D Printing Limit:-
To test the 3D printing limit I printed out a standard test print, which have various cases which test the limit of the printer. I downloaded this test print from ‘Thingiverse’ which can be found here 3D Printer Test Print
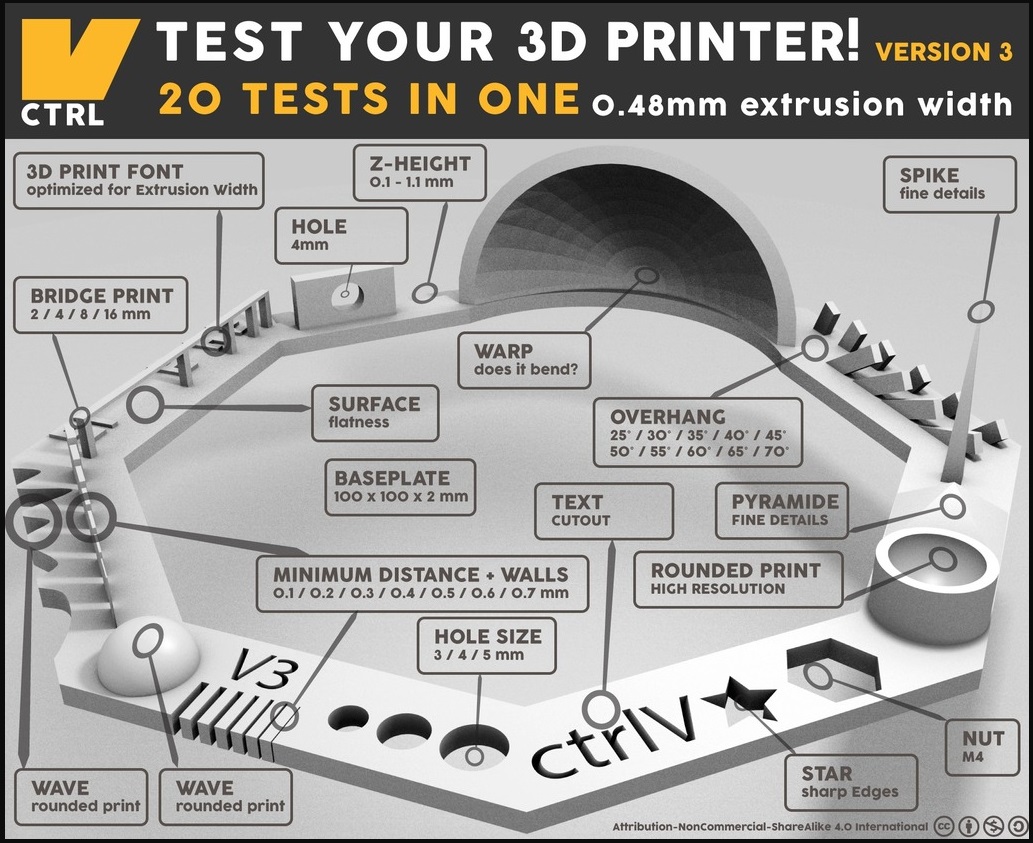
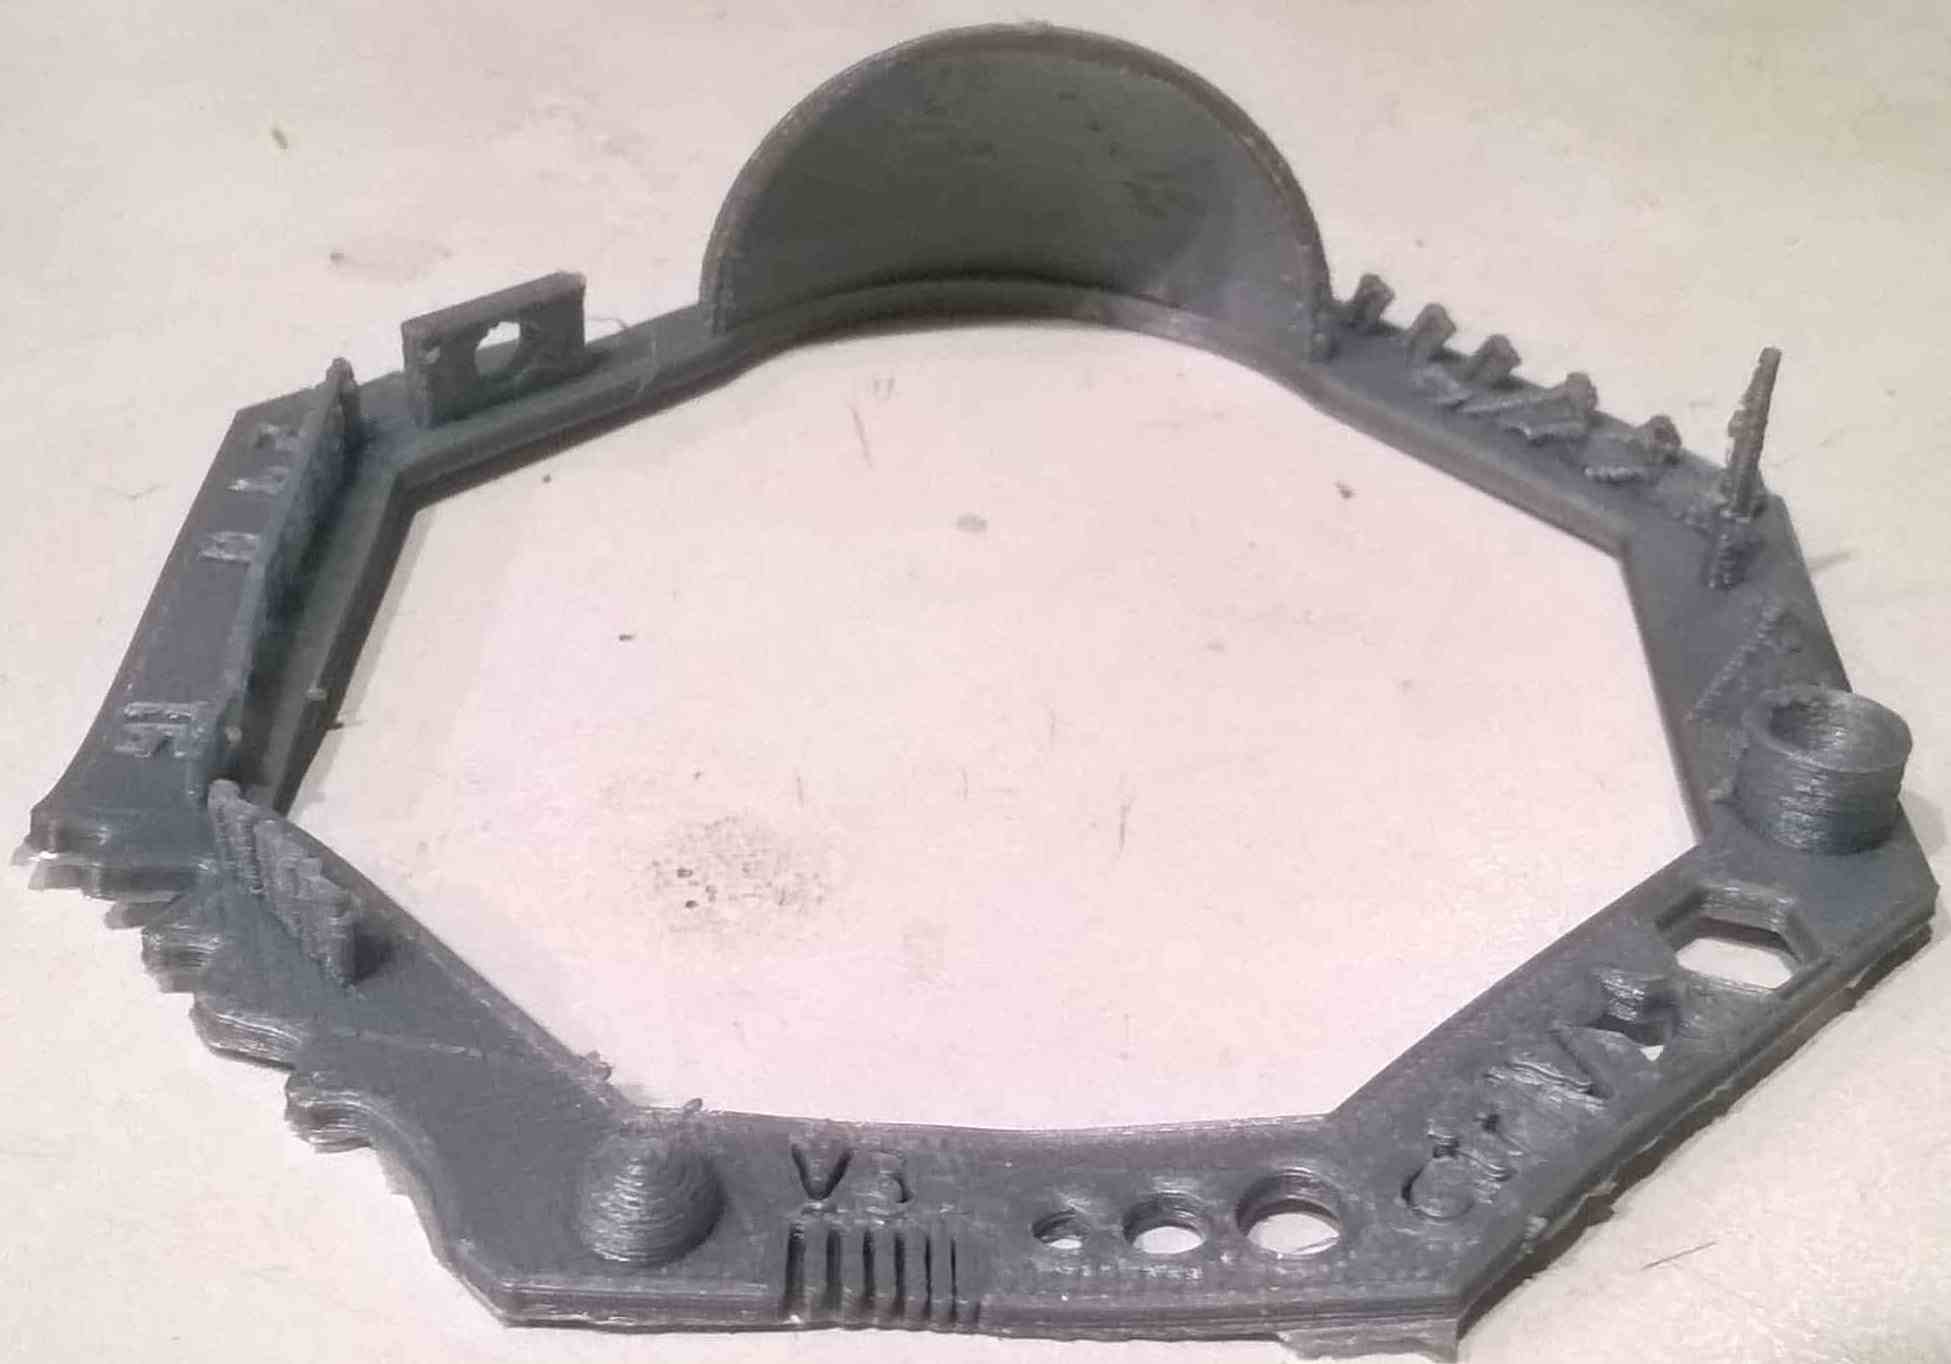
The shapes included in the design are
01 Nut, Size M4 Nut should fit perfectly - Matches exactly with M4 Nut
02 Wave, rounded print - Looks Good
03 Star, Sharp Edges - Looks Fine
04 Name, Complex Shapes - Nicely Printed
05 Holes, Size 3, 4, 5 mm - Matches Exactly with Size
06 minimal Distance: 0.1, 0.2, 0.3, 0.4, 0.5, 0.6, 0.7 mm - 0.1 & 0.2 mm gap wasn't that clear, maybe because it was printed as Raft
07 Z height: 0.1, 0.2, 0.3, 0.4, 0.5, 0.6, 0.7, 0.8, 0.9, 1.0, 1.1 mm - Fine
08 Wall Thickness: 0.1, 0.2, 0.3, 0.4, 0.5, 0.6, 0.7 mm - Printed Fine
09 Bridge Print: 2, 4, 8, 16 mm - Good
10 Sphere, Rounded Print 4.8mm height - Good
11 Sphere Mix, 7 mm height - Nicely Printed
12 Pyramide, 7 mm height - only the top point was not good
13 Overhang: 25, 30, 35, 40, 45, 50, 55, 60, 65, 70° - Printed all but after some time broke
14 Warp, does it bend? - No it doesn't
15 3D Print Font, optimized for 3D printing - Good
16 Surface, Flatness - Good
17 Size, 100 x 100mm x 23.83 (10mm width) - Fine
18 Spike, minimum Layer Time, 21 mm height from Bottom (include Baseplate) - printed in just 1 hrs 16 min, was good enough
19 Hole in Wall, 4 mm diameter, check for proper print - Matched Dimensions
20 Raft Test, raft should be just under the model - Filled some gaps wasn't that good
21 Retract Travel, check retract settings for longer travel - Fine
Individual Assignment:
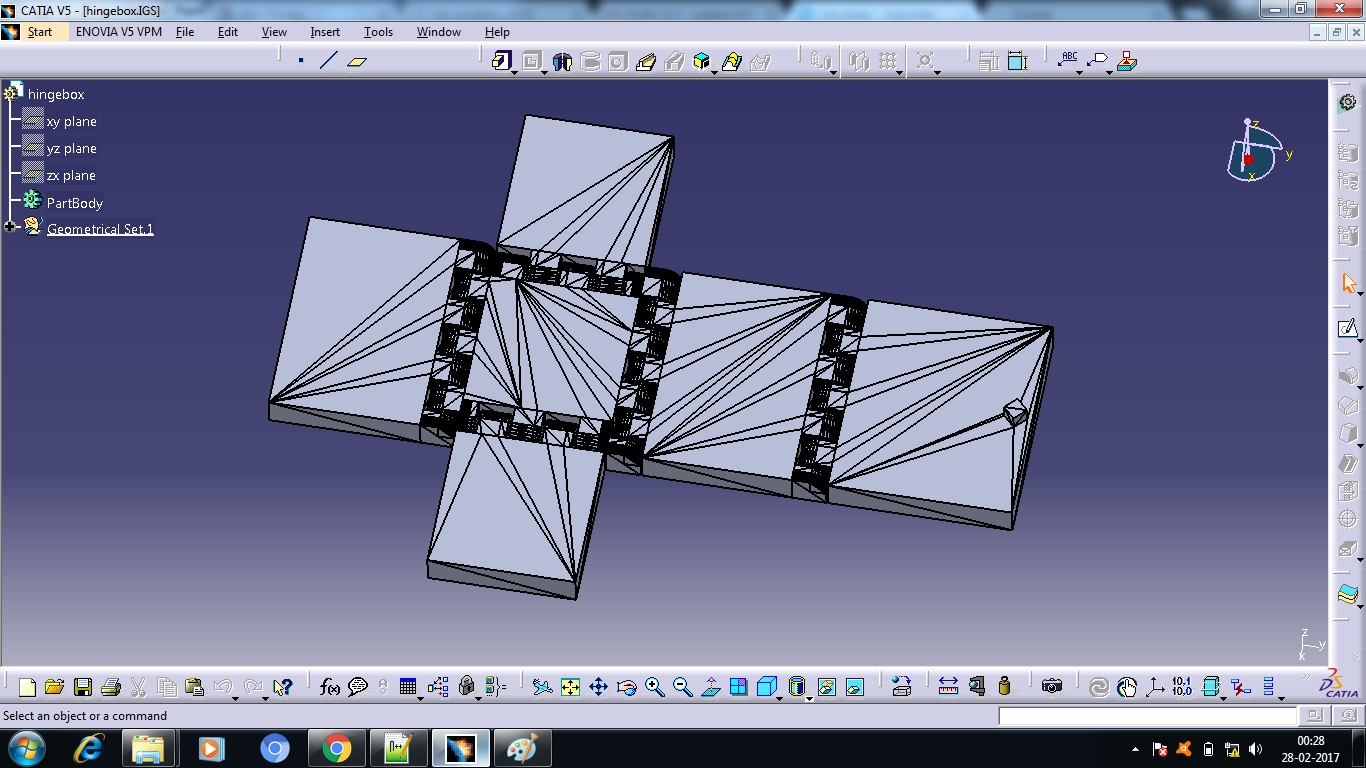
In this individual assignment I designed and printed a Hinged Box.
Design:-
While designing the Hinged Box, I just made all the walls in Hinged Box as so the it should be printed as one and can be easily openable and close. So here I made kind of a ball and socket joint in between all walls and made it flexible.
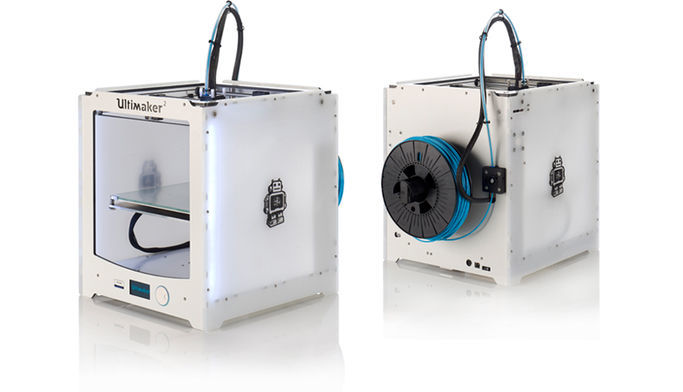
Printing Process:
I imported the file in the machine software for Ultimaker 2, which is CURA. There are tools available to set the object properly on the printing bed. Proper alignment of the object is necessary if not done properly the object may not be printed properly or may be extra support material will be printed. So to avoid these errors the software provides a tab to Lay Flat the object on the print bed.

After aligning the object properly now I set the parameter to print the object, as layer height = 0.1 mm, shell thickness = 0.8 mm, fill density = 20%, printing speed = 60 mm/s
Later just saved the file as g-codes and copied it to the SD Card and the object is ready to get printed, but before that just check the bed alignment with the nozzle, it is supposed to of a Paper Thin distance between them. After bed aligning now the printer is ready to print the desired object, so now just start the print.
Final Product after printing:

Download the .stl files from here: